Make & Sell Digital Planners on Etsy: Beginner’s Guide
Step 1: Plan Your Digital Planner Design and Niche
Identify Your Target Audience and Their Needs
Before you even open design software, pinpoint who your digital planner is for. Are they students needing academic trackers, busy moms juggling schedules, or entrepreneurs organizing their businesses? Research existing planners on Etsy to see what’s popular and what gaps you can fill. Look at reviews for common complaints or desired features. For instance, if you target students, consider incorporating assignment trackers, study schedules, and perhaps even a grade calculator. If targeting entrepreneurs, think about goal-setting pages, social media planners, or income trackers. The more specific your audience, the easier it is to tailor your planner’s content and design.
Determine Your Planner’s Core Features and Aesthetic
Based on your target audience, decide on the essential components of your planner. Will it be dated or undated? Weekly, monthly, or daily layouts? What unique sections will it include (e.g., habit trackers, financial dashboards, fitness logs)? Sketch out your ideal page layouts on paper first. Consider the overall visual style: minimalist, bohemian, vibrant, or professional. Choose a consistent color palette and font pairing that aligns with your chosen aesthetic. This consistency is crucial for brand recognition and user experience. For example, a minimalist planner might use a monochromatic palette and sans-serif fonts, while a vibrant planner might incorporate bright colors and playful typography.
Step 2: Create Your Digital Planner Files
Choose Your Design Software (e.g., Canva, Procreate, Affinity Designer)
Select the design software that best suits your skill level and budget.
- Canva: Excellent for beginners due to its drag-and-drop interface and vast template library. It’s web-based and offers a free tier, but the Pro version unlocks more features. Ideal for creating simple, elegant planners.
- Procreate: Best for iPad users who want to hand-draw elements or create a more artistic, custom feel. Requires a one-time purchase.
- Affinity Designer: A professional-grade vector graphic editor, similar to Adobe Illustrator but with a one-time purchase. Offers precise control over design elements and is great for scalable designs and complex layouts.
- Keynote/PowerPoint/Google Slides: Surprisingly capable for creating basic digital planners, especially for those familiar with presentations. You can create shapes, text boxes, and even add hyperlinks.
Familiarize yourself with the chosen software’s tools for creating shapes, text boxes, and most importantly, hyperlinks.
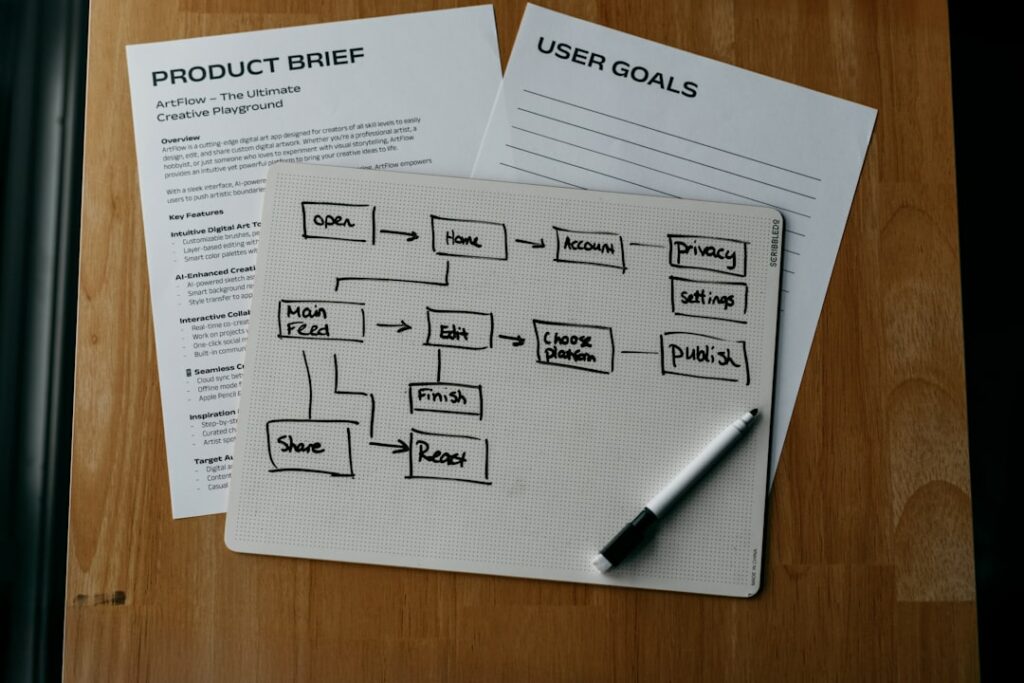
Design Your Planner Pages and Hyperlinks
Begin designing your planner pages. For digital planners, the key is navigability. Create a master template for recurring pages (e.g., daily, weekly, monthly layouts) to maintain consistency. Design tabs or buttons on the side or top of your planner that will serve as navigational links. These are typically small, clickable areas that, when tapped, take the user to a specific section (e.g., “Jan,” “Feb,” “Goals,” “Notes”). In your chosen software, select the object you want to be clickable (e.g., a text box, a shape, an icon) and find the “Add Link” or “Hyperlink” option. Link it to the specific page number or named destination within your document. Test every single hyperlink thoroughly before exporting to ensure a seamless user experience. A common practice is to create a “home” or “index” page that links to all major sections.
Step 3: Prepare Your Planner for Etsy Sales
Export Your Planner as a High-Quality PDF
Once your design is complete and all hyperlinks are tested, export your planner as a high-quality PDF. This is the standard format for digital planners. When exporting, look for options like “Print Quality,” “High Resolution,” or “Smallest File Size” (if the quality remains high). Avoid compressing the file too much, as it can degrade image quality and readability. Ensure all fonts are embedded in the PDF to prevent display issues on different devices. For larger planners, you might consider offering it in a zipped folder if it exceeds Etsy’s individual file size limits, but generally, a single PDF is preferred for ease of use.
Create Engaging Mockups and Listing Images
High-quality visuals are crucial for attracting buyers.
- Mockups: Use mockup generators (e.g., Placeit, Smartmockups) or Photoshop templates to display your planner realistically on digital devices like iPads, tablets, or laptops. This helps customers visualize themselves using the product.
- Internal Previews: Include screenshots of key internal pages (e.g., a weekly layout, a habit tracker, a goal-setting page) to show the planner’s functionality and design.
- Informational Graphics: Create graphics that highlight key features, benefits, and what’s included in the purchase (e.g., “What’s Included,” “Features,” “How It Works”).
- Lifestyle Shots: If possible, create or use stock photos that show someone interacting with a tablet that has your planner on it.
Aim for at least 5-10 compelling images that showcase different aspects of your planner and its value.
Step 4: Set Up Your Etsy Shop and Listing
Open Your Etsy Shop and Configure Payment Settings
If you don’t already have an Etsy shop, go to Etsy.com and click “Sell on Etsy.” Follow the prompts to set up your shop, including choosing a shop name (make it relevant and memorable), selecting your shop currency, and configuring your payment settings (Etsy Payments). Ensure your bank account details are correctly linked for payouts. Familiarize yourself with Etsy’s seller policies and fees (listing fees, transaction fees, payment processing fees).
Write a Compelling Product Description and Optimize Tags
Your listing needs to be found and convince buyers.
- Title: Use relevant keywords (e.g., “Undated Digital Planner,” “iPad Planner,” “GoodNotes Planner,” “Productivity Planner”).
- Description:
- Start with a strong hook describing who the planner is for and its main benefit.
- Detail all included pages and features.
- Explain how to use the planner (e.g., “Compatible with GoodNotes, Notability, Xodo”).
- List what the customer will receive (e.g., “1 PDF file,” “Instructions”).
- Include disclaimers (e.g., “This is a digital product, no physical item will be shipped,” “For personal use only”).
- Add a call to action (e.g., “Start planning your best year today!”).
- Tags: Use all 13 available tags. Think like a buyer and use a mix of broad and specific keywords (e.g., “digital planner,” “daily planner,” “goodnotes planner,” “productivity journal,” “ipad planner,” “undated planner,” “hyperlinked planner,” “student planner,” “business planner,” “digital notebook,” “pdf planner,” “etsy planner,” “planner download”).
- Category & Attributes: Select the most relevant category (e.g., “Digital” > “Planners” or “Digital Prints”). Fill out all applicable attributes (e.g., “File Type: PDF,” “Instant Download”).
After publishing, monitor your listing’s performance and adjust tags and descriptions as needed based on traffic and sales data.
FAQ 1: How do I make my digital planner compatible with different apps like GoodNotes and Notability?
Digital planners created as hyperlinked PDFs are generally compatible with most PDF annotation apps, including GoodNotes, Notability, Xodo, and Adobe Acrobat Reader. The key is to ensure your hyperlinks are correctly embedded and functional within the PDF. You don’t need to create separate versions for each app; a single well-made hyperlinked PDF will work across them. Buyers simply import the PDF into their preferred app.
FAQ 2: What is a good price point for a digital planner on Etsy?
Pricing varies widely based on complexity, design quality, and niche. Research similar digital planners on Etsy that have good sales. Basic, undated planners might range from $5-$15, while more elaborate, niche-specific, or highly designed planners with many features could sell for $15-$40+. Consider the time invested in creation, the value you provide, and Etsy’s fees when setting your price. Offering bundles or sales can also be effective.
FAQ 3: How do I deliver the digital file to my customers after purchase?
Etsy handles digital file delivery automatically. When you create your listing, you’ll upload the digital file (your PDF or a ZIP file containing it) directly to the listing. After a customer purchases, Etsy provides them with a link to download the file instantly on their purchase confirmation page and via email. You do not need to manually send files.
FAQ 4: Can I use copyrighted images or fonts in my digital planner?
No, you must only use images, fonts, and other design elements that you have the legal right to use for commercial purposes. This means using royalty-free resources, elements with commercial licenses, or creating all elements yourself. Using copyrighted material without permission can lead to legal issues and having your Etsy shop shut down. Always check the licensing terms for any external assets you incorporate.